.jpg) |
| STAMPING ON BLACK CARD |
Saturday, 18 May 2013
STAMPING AND COLOURING ON BLACK CARD
Saturday, 11 May 2013
RESIN V DIMENSIONAL MAGIC

We were aiming at a sort of shiny button effect (with the thought of using it to decorate wooden boxes or jewelry) so we compared paper covered with Dimensional magic to the same covered with two-part resin. Neither seemed to cause the dye in the (Kaiser) paper to run which was good as I had anticipated we may need to seal it first (I'd still do a test run before a proper project with other papers). The DM despite my best efforts still had a couple of bubbles. I'd read that a heat gun would cause them to disappear so duly got out my embossing heat gun and........nothing at all happened to the surface at all until the whole thing essentially started to blow up like a big bubblegum bubble and then burst!!!! This was amusing but not very encouraging as the end result was all cracked and scratched. I popped the bubbles on the "second try" effort with a pin, which worked better. The finish on the two part resin was by far the smoothest and shiniest but it had the effect of greatly darkening the paper which wasn't entirely ideal either.
The end result is that both finishes have potential but drawbacks..........more playtime needed!!!
Saturday, 4 May 2013
EMBOSSED DIE CUT OWLS
 |
| EMBOSSED DIECUTS |
Saturday, 27 April 2013
BEADED PAPER CARDS
.jpg) |
| CARD WITH BLACK BEAD DETAIL |
close+up.jpg) |
| CLOSE-UP DETAIL OF BLACK BEAD CARD |
I seem to have amassed a huge quantity of seed beads for reasons that have been lost in the clouds of time. Even although the quantity used in these examples barely make a dent in the collection it is one way of putting a few to a good use.
These super quick cards are just a combination of some Graphic 45 paper a couple of diecuts (Spellbinders and Cuttlebug) and a few seed beads, sewn on with gold thread.
If you pierce the holes prior to sewing there's less chance of tearing the paper.
bcloseup.jpg) |
| CLOSE UP OF CARD WITH IVORY BEADS |
b.jpg)
Saturday, 20 April 2013
YELLOW 3D FLOWER
 |
| YELLOW CARD WITH 3D FLOWER |
The stamps are from Martha Stewart. The three flowers (all of slightly different shape and of decreasing size) have all been stamped on 150g paper, cut out and then reassembled with foam sticky dots between each layer to make a 3d effect.
The thing I have done which is new to me, is use yellow ink! I know it sounds silly but I think I have somehow managed to stamp for the best part of thirty years without ever owning a yellow ink pad before now!!! White mesh and two different embossing patterns give the overall card a nice textured look (and feel), although its not at all the sort of card I would usually make.
Saturday, 13 April 2013
GLITTER BALLOONS
 |
| GLITTER BALLOONS |
The glitter I've used in this example is an extremely chunky one (some may go so far as to say cheap and nasty). Every time I've tried to use this is just sort of collect in clumps and bits fall off the page. Before consigning it to the rubbish I've given it one last try.
For this sample I've die cut balloons (using a Cuttlebug die) form acetate, and applied the glitter to the underside using dimensional magic instead of glue so the top is glittery but smooth.
The picture (I've cheated and drawn in some "strings" digitally) doesn't really do the end result justice. Its not a hundred percent fine (you can see where I've failed to fill to the edge in the smallest balloon) but I'm happy enough with the end product to put the glitter back on the shelf instead of in the bin.
Saturday, 6 April 2013
HEARTS WITH DIMENSIONAL MAGIC
 |
| DIMENSIONAL MAGIC OVER GLITTER PAPER |
 |
| DIMENSIONAL MAGIC WITH GLITTER SPRINKLE |
The first sample is just a piece of Kaiser paper with glitter already in place, stuck to a wooden heart shape and covered with a layer of dimensional magic. I inked the edges with gold ink first, although you can't really see this in the picture. The dimensional magic tones down the glitter a bit but the result is OK. The second sample is on a die cut of thick card, painted pink, then covered with dimensional magic with glitter sprinkled on top.
Two of the issues I have with dimensional magic and similar products are that I almost always end up with bubbles and that the material I use as a base almost always buckles. Both have been avoided here.....really its a matter of not rushing things. I let the dimensional magic flow of its own accord, resisting the urge to shake or squeeze it, and then carefully popped the few little air bubbles with a pin. ( I even had the heat gun out in case I needed to smooth them out with this but it proved unneccessary). As for the second issue, it didn't arise due to the thickness of the bases. I guess I should try some other samples using thinner bases and perhaps sealing them first? Perhaps for a later post.........
Saturday, 30 March 2013
OBSCURING TEXT FROM BOOK PAGES
 |
| PAGES WITH PAINT |
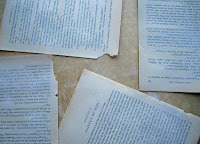 |
| PAGES WITH GESSO |
 |
| WOVEN GESSO STRIPS |
One of the issues faced when using book pages for craft projects is that sometimes the actual words on the page are inappropriate. I gave some of the pages a light coating of acrylic paint - a second light coat would have obscured the words sufficiently whilst still retaining the look of text. For the second sample I used gesso, with similar results. The main difference was that the latter was "toothier" and would probably make a better base for stamping etc.
If you're still worrying about the text being too readable, you could always cut your paper into strips and weave it together as shown in the third picture!
Saturday, 23 March 2013
EYESHADOW/CHALK STAMP AND BACKGROUND
 |
| EYESHADOW IMAGE WITH BACKGROUND |
 |
| Add caption |
Saturday, 16 March 2013
SCALLOPED CIRCLE SPIRELLI
 |
| SCALLOPED CIRCLE SPIRELLI |
Saturday, 9 March 2013
EASY LAYERED FLOWER

Saturday, 2 March 2013
THREE LAYER PAPER CARD


Saturday, 23 February 2013
MODELLING PASTE FAUX EMBOSSING

Saturday, 16 February 2013
EYESHADOW BACKGROUND
 |
| Eyeshadows as a background for stamping |
Saturday, 9 February 2013
LAYERED FLOWER
 |
| SIMPLE LAYERED FLOWER |
Subscribe to:
Posts (Atom)