Showing posts with label Paint. Show all posts

Saturday, 7 November 2015

BACKGROUND WITH RICE AND ACRYLIC PAINT

RICE ON WET PAINT
 I'm always keen to try new background techniques, but as this one is a bit on the messy side, I haven't had the chance to try it until now.  (Hence I have forgotten the source of the idea.....sorry....happy to credit if you want to claim it as your own).

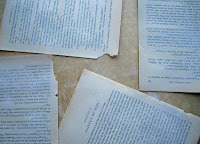
The idea is basically just to spread a layer of very watery acrylic paint, and then sprinkle rice on top immediately.

After the paint is completely dry, the rice is removed.  The rice absorbs some of the paint, leaving paint-free areas, and creating patterns.

As you can see, it worked OK.....not remarkably.  I think it would probably be better had a used a less absorbent paper as the background so that more liquid is taken up by the rice.  I also found it impossible to remove the rice without ripping some of the paper underneath.  This isn't necessarily bad - it does have its own "look."

All in all I'm glad I finally got around to trying this technique but don't think I'll be using it frequently. There are easier ways of creating similar effects, and in terms of the lay on/take off technique, salt seems more reliable.  Still, if you haven't tried it its worth a go.  I imagine dark blue paint on gold or silver paper might make a nice starry sky.........
RICE PATTERNED BACKGROUND

Saturday, 21 February 2015

EMBOSSING WITH WHITE CRAYON RESIST

WHITE CRAYON AND WATERCOLOUR WASH
A nice batik-like result can be obtained by colouring part of a dry embossed image with white crayon, then adding a watercolour wash.
Colourless crayons are also available if you wanted to try the technique over patterned or coloured paper.

Now....on a different topic.  I've been doing a Papertrek posting every week for three years and three days now!  This means that there are over 150 posts so I have a collection of techniques preserved for myself to browse and hopefully to be of use to other folk who find their way to the blog.

I think its time to concentrate a bit more on quality over quantity now.  Like most people, I'm rather time poor so rather than just put things up for the sake of it, I'll wait until I have something I think is worth sharing.  So....I might post a few weeks in a row, I might have a few weeks "off" or I might even put up a lots things in two or three days.  Who knows.  The blog will continue but for now.......I'm taking a couple of weeks holiday.  Be back soon.

Saturday, 5 July 2014

LEAF-PRINTED BACKGROUND

LEAF PRINT BACKGROUND
 I bought a really nice set of leaf stamps recently, but there is an alternative - real leaves!!  This little bunch came from a banksia rose.  I just dabbed some Versacolour ink directly onto the underside of the leaves. Pigment inks are a bit stickier than dye-based ones and I suspect work best for this, though I'm happy to be corrected.  I'd already made a base background by "printing" with distress inks on an acrylic block (as in a recent post).  the brighter green is the first print, the more subtle example is the second print.  I placed the inked leaves on top and brayered over the top to apply an even pressure, and made a couple of prints before re-inking.  I applied them in a random way, similarly to the stamps in last week's example.
The results with rubber stamps are obviously more predictable but this approach will produce a truly unique result (which you can of course scan if you want to reproduce it).

Saturday, 21 June 2014

SALT AND ACRYLIC WASH BACKGROUND

SALT AND ACRYLIC WASH
I love this paper!!   Just brush a very watery layer of acrylic paint over a sheet of thick paper (I use a dark green paint from Kaiser), then sprinkle with salt (I used ground sea salt).  After its thoroughly dry brush off the salt and you're left with tiny little specks where the grains of salt lay.  In this example they look a bit like miniature moon craters.  I think you could do some great faux rust with oranges and red.
I've seen this technique used with different colouring mediums (watercolours, ink) and different salts, and suspect all the combinations may produce somewhat different results - certainly worth exploring!!

Saturday, 18 January 2014

SUPER SIMPLE DO IT YOURSELF BACKGROUND STAMP

STRING STAMP
I think this photo is fairly self-explanatory but......  If you would like a simple background stamp, just wrap string around a block of some sort (I used the box which used to be packaging for a hole punch).  Tie it off at the top so that the knot doesn't intrude into the design,  Paint on a little acrylic paint and stamp it gently onto the surfact you want to decorate. Too much pressure tends to squeeze the paint out, so all you need is basically to make contact with the paper/card.
thats all there is to it.  Cheap as chips and quite effective!

Saturday, 30 March 2013

OBSCURING TEXT FROM BOOK PAGES

PAGES WITH PAINT
PAGES WITH GESSO
WOVEN GESSO STRIPS
I've been playing around with old book pages over the last few weeks.  The hardest bit was biting the bullet and actually tearing up a book!!!   In the end this one was a very old paperback which had pages missing and which was falling apart.  Plus I already had another copy!  Even so........Having finally cleared the first hurdle the rest has been comparatively easy.

One of the issues faced when using book pages for craft projects is that sometimes the actual words on the page are inappropriate.  I gave some of the pages a light coating of acrylic paint  - a second light coat would have obscured the words sufficiently whilst still retaining the look of text.  For the second sample I used gesso, with similar results.  The main difference was that the latter was "toothier" and would probably make a better base for stamping etc.

If you're still worrying about the text being too readable, you could always cut your paper into strips and weave it together as shown in the third picture!

Saturday, 19 January 2013

FOIL EMBOSSED HEART

This is a piece of thick cardboard with a thick die-cut heart .  stuck on top.  The whole thing is then wrapped in aluminium cooking foil, working gently around the heart so that the shape stands out clearly.  You could tape or glue it at the back of the card but if you fold it carefully it will generally stay in place long enough to secure it to your eventual background.  Next paint over the whole thing with acrylic paint, and while it is still wet, wipe the heart so that some of the original aluminium foil can be seen. You can try it with different coloured paints and different coloured foils (some supermarkets sell these now), and of course the shape doesn't have to be a heart.  The panel can be used "as is" or further decorated, before being used as a card, in a scrapbook or as an ATC.

Saturday, 22 September 2012

BUBBLEWRAP PRINTING


I actually have a "bubblewrap"  background stamp which is great, but when I was cleaning up my craft room (yes, it does happen occasionally) I found some bubblewrap and as I had the paints out to do the hessian and onion bag prints that I posted a few weeks ago, I thought I'd have a go with the real thing.  Although I had no particular end in mind, the yellow on yellow reminded be of honeycomb, so I added an acetate overlay with a beehive stamp from the Flourishes range. Now that I've had a play with paint over the last little while, I think I'm ready to embark on some more thoughtful projects.....not that you'll see them here....this is just for the first step of the process, and I have a list of things a mile long that I want to try,,,now if only there were 48 hours in every day!!!!!!

Saturday, 15 September 2012

WHITE GESSO ON BLACK CARD

I'd never really used gesso until the last few months but now I'm a real convert, as there seems to be so many ways in which it can be used.  If you want a similar effect to the one in the photo, cover black card with a thin layer of white gesso.  When it's dry sponge on two or three different inks (I've used red, green and gold, and to be honest, just applied it straight from the pads)  I've then just run it through my Cuttlebug, using a folder from Craft Concepts.

Saturday, 18 August 2012

VERY EASY PAINTED BACKGROUND

Two postings in one day!  I was asked to put this background up after the recent demo I did.  So here it is!!

Its a super easy one - I wanted some background paper on which to mount my pictures of the Pilbara, and so just blobbed some silver, gold and copper straight onto light card (directly from the tube of acrylic paint), and spread it with a brush so that areas blended and the whole page was covered.

For something that took two minutes it turned out exactly as I had hoped, and I'll be making some more.

I scanned it and used it to make up a title too.  (Just open another layer over the top of the scanned painted paper, type in your title, select it using the magic wand tool, then cut out the selection to reveal the painted "filling" underneath before collapsing the layers.

Saturday, 4 August 2012

PAINT AND PRINT BACKGROUND

Hessian Print
Onion Bag Print


I've been printing with paint......nothing too difficult, basically just painting on some Kaiser acrylic paint straight from the tube and then pressing the object onto some light card.  The green sample is hessian, the red print was made with an onion bag.  Both were a bit hard to press down on "as is" so I covered the painted item with a piece of scrap card and lightly brayered over the top to apply the pressure to print.  The rose stamp is from Rubbadubbadoo and was stamped with Staz On onto acetate.  The image was then coloured in with a red Sharpie pen.