Saturday, 30 March 2013

OBSCURING TEXT FROM BOOK PAGES

PAGES WITH PAINT
PAGES WITH GESSO
WOVEN GESSO STRIPS
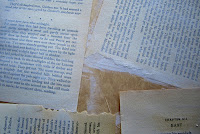
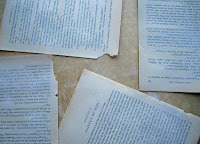
I've been playing around with old book pages over the last few weeks.  The hardest bit was biting the bullet and actually tearing up a book!!!   In the end this one was a very old paperback which had pages missing and which was falling apart.  Plus I already had another copy!  Even so........Having finally cleared the first hurdle the rest has been comparatively easy.

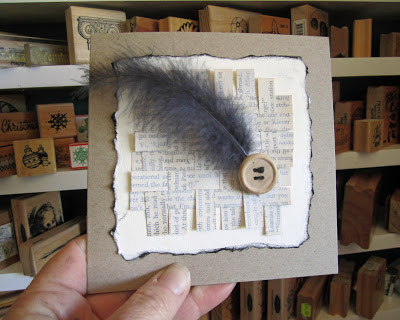
One of the issues faced when using book pages for craft projects is that sometimes the actual words on the page are inappropriate.  I gave some of the pages a light coating of acrylic paint  - a second light coat would have obscured the words sufficiently whilst still retaining the look of text.  For the second sample I used gesso, with similar results.  The main difference was that the latter was "toothier" and would probably make a better base for stamping etc.

If you're still worrying about the text being too readable, you could always cut your paper into strips and weave it together as shown in the third picture!

Saturday, 23 March 2013

EYESHADOW/CHALK STAMP AND BACKGROUND

EYESHADOW IMAGE WITH BACKGROUND
I'm still playing with my eyeshadow set (a couple of dollars is going a really long way).  Back in January I posted a picture of a peacock stamp which I'd dusted with a variety of colours.  Subsequently I've used them to colour a background for stamping.
Add caption
I wondered if applying them more liberally to  a watermark ink stamped image (this one is Graphic 45 from Hampton Art) would kill two birds with one stone by making both image and background, or whether it would just end up as a murky mess.  Well....here are the results...OK I think.  I used blue and magenta.  (And every time I use colours such as these I smile as I imagine the reaction if I actually used the eyeshadows as intended... a whole new look for work on Monday??)

Saturday, 16 March 2013

SCALLOPED CIRCLE SPIRELLI

SCALLOPED CIRCLE SPIRELLI
Looking for something else to do with your scalloped circle hole punches or die cuts?  How about wrapping them in some thread.  I've used a fairly thick variegated embroidery thread (unfortunately you can't really see the colours very well in the photo), and just taped it to the back to begin.  If you want a large hole in the middle don't skip over too many scallops when you are winding.  For a small hole, do the reverse.  Just keep going sequentially until there are two threads from each gap, and then tape the end to the back to finish.

Saturday, 9 March 2013

EASY LAYERED FLOWER

Here's another easy flower to make using layered punched or die cut flowers.  Most shapes will work, just duplicate the base layer and then cut a section from the next shape. Remove  a slightly larger piece from each subsequent layer.  Overlap the edges and secure with double sided tape or glue.  Pierce a small hole in the base of each shape and layer from flattest to most curled and secure with a split pin.

Saturday, 2 March 2013

THREE LAYER PAPER CARD

 I bought this pretty pink card a few years ago at Tokyo airport. I just loved the way it was constructed, and so decided to make my own.  The middle (burgundy) layer is longest, and is pleated at one end.  This means that the card can be closed by tucking the other side into a fold.  Its a little hard to see from the photo, but I have used a light mulberry paper with a lot of plant fibre for the orange cover, a burgundy embossed paper for the middle, and a  gold shimmer for the interior.  This card is a real treat for paper lovers, and really need no extra decoration.

Saturday, 23 February 2013

MODELLING PASTE FAUX EMBOSSING

I came across a container of modelling paste a few weeks ago and couldn't resist.  I have never used it before and so obviously have a lot to learn...hence this week's post is about the most simple thing you can do with it.  To produce the image on the left, all I did was to hold (not even tape, although I probably should have done so) one of my old brass stencils on top of a piece of light card and spread some modelling paste over the top using an old credit card.  This was the result when the stencil was lifted off.  As you can see its a bit rough and ready but has a lot of potential.  I can't wait to try some other techniques!!

Saturday, 16 February 2013

EYESHADOW BACKGROUND

Eyeshadows as a background for stamping
Here is another eyeshadow idea....using it to create a "sunset" background for these tree stamps from Rubbadubbadoo.  I like the softness of the result of simply stamping over the chalked (eyeshadowed) background with black pigment ink,  but I might try stamping and embossing for a future post to compare results.

Saturday, 9 February 2013

LAYERED FLOWER

SIMPLE LAYERED FLOWER
A nice easy technique for this week...simply chose three or more punches of the same shape but of a different size, cut one or two of each size, stack them (offsetting the petals) and secure with a split pin.  Gently shape the petals.  You can do this with your fingers after construction or, if you want a more shaped result, use an embossing or paper tole tool on a soft mat to add dimension before assembling.  Of course, option three is just to stack them up with no shaping at all, which can sometimes be most appropriate, especially if you are using it on a card that needs to be posted flat in an envelope

Saturday, 2 February 2013

BRONZER AND VERSAMARK

VERSAMARK AND BRONZER
But wait there's more....following on from the eyeshadow post of last week, I was delighted to find that the bronzer that came with the eyeshadow works equally well when brushed over an image stamped with Versamark ink!  It has a lovely metallic glow....

Saturday, 26 January 2013

COLOURING WITH EYESHADOWS

Eyeshadow + Versamark Peacock
I saw a fabulous palette of eyeshadows at a ridiculously cheap price recently and couldn't resist!!  Eyeshadows make a great substitution for chalks in stamping and you can basically use them the same way.  In this example I've used Versamark (watermarking ink ) to stamp this Graphic45 peacock  and then applied a variety of colours over the top.  (I'm tempted to say "applied with a sponge applicator" but truthfully I used my fingers).  This was just a trial run but I'm happy with the results.  If you wanted I expect it could be sealed with hairspray or "proper" fixative, but its fairly stable as is" and if I was using it for a greeting card I probably wouldn't bother.  I have some more eyeshadow ideas to try out over the next few weeks.

Saturday, 19 January 2013

FOIL EMBOSSED HEART

This is a piece of thick cardboard with a thick die-cut heart .  stuck on top.  The whole thing is then wrapped in aluminium cooking foil, working gently around the heart so that the shape stands out clearly.  You could tape or glue it at the back of the card but if you fold it carefully it will generally stay in place long enough to secure it to your eventual background.  Next paint over the whole thing with acrylic paint, and while it is still wet, wipe the heart so that some of the original aluminium foil can be seen. You can try it with different coloured paints and different coloured foils (some supermarkets sell these now), and of course the shape doesn't have to be a heart.  The panel can be used "as is" or further decorated, before being used as a card, in a scrapbook or as an ATC.

Saturday, 12 January 2013

HANDMADE PAPER BACKGROUND

This is a nice simple background technique that I stumbled upon by accident.  Apply a lot of glue stick to a soft handmade paper (in this case the green) and apply it to a similar paper in another colour (white).  Run the whole lot through an embossing machine (I used my trusty Cuttlebug) while the glue is still wet and the papers will meld together, and appear as one, rather than two layers.  I have just ripped the green paper into strips which works quite well as the torn edges assist the bonding.

Saturday, 5 January 2013

COLOURING WITH WATER-BASED PENS

This is a Crafts Too embossing folder coloured with Tombow pens - only a few colours and a lot of blending pen.  Colouring is still not my strong point but I think I might practise a bit more with water-based markers as I've seen some really good results.  I'm quite keen to try colouring some photos as I've had a little play and found they seem to work quite well for this as well.

Saturday, 29 December 2012

STAMPING WITH CORKS

Another simple background technique this week....and one you may well have tried as a little person.  As is sometimes the case, this looks more effective in reality that in the photo, as the metallic ink and embossing lose some of their shine "in translation".  The technique is simply to use cork as a stamp.  In this example I've used white and gold acrylic paint, and then added some round gold stamps.  Ink would give a more even result.  The edge of the circle has been rubbed roughlyy with versamark and then heat embossed with gold  powder.  the stamp on the red circle is also embossed.

Saturday, 22 December 2012

STAMP PAD BACKGOUNDS


At this time of year there is no time for complicated techniques so this is about as simple as it can be.  I've just punched out some squares from textured card, pressed a little square pink stamp pad lightly onto the middle (not really trying to get the edges to print).  After a couple of moments drying time I've overstamped with little motifs, using black inks.

Use one to decorate a gift card, three for a standard "rectangular" card and all four for a square card.