Saturday, 22 February 2014

MAGIC CLAY IN SILICONE MOLDS

MAGIC CLAY IN SILICONE MOLDS
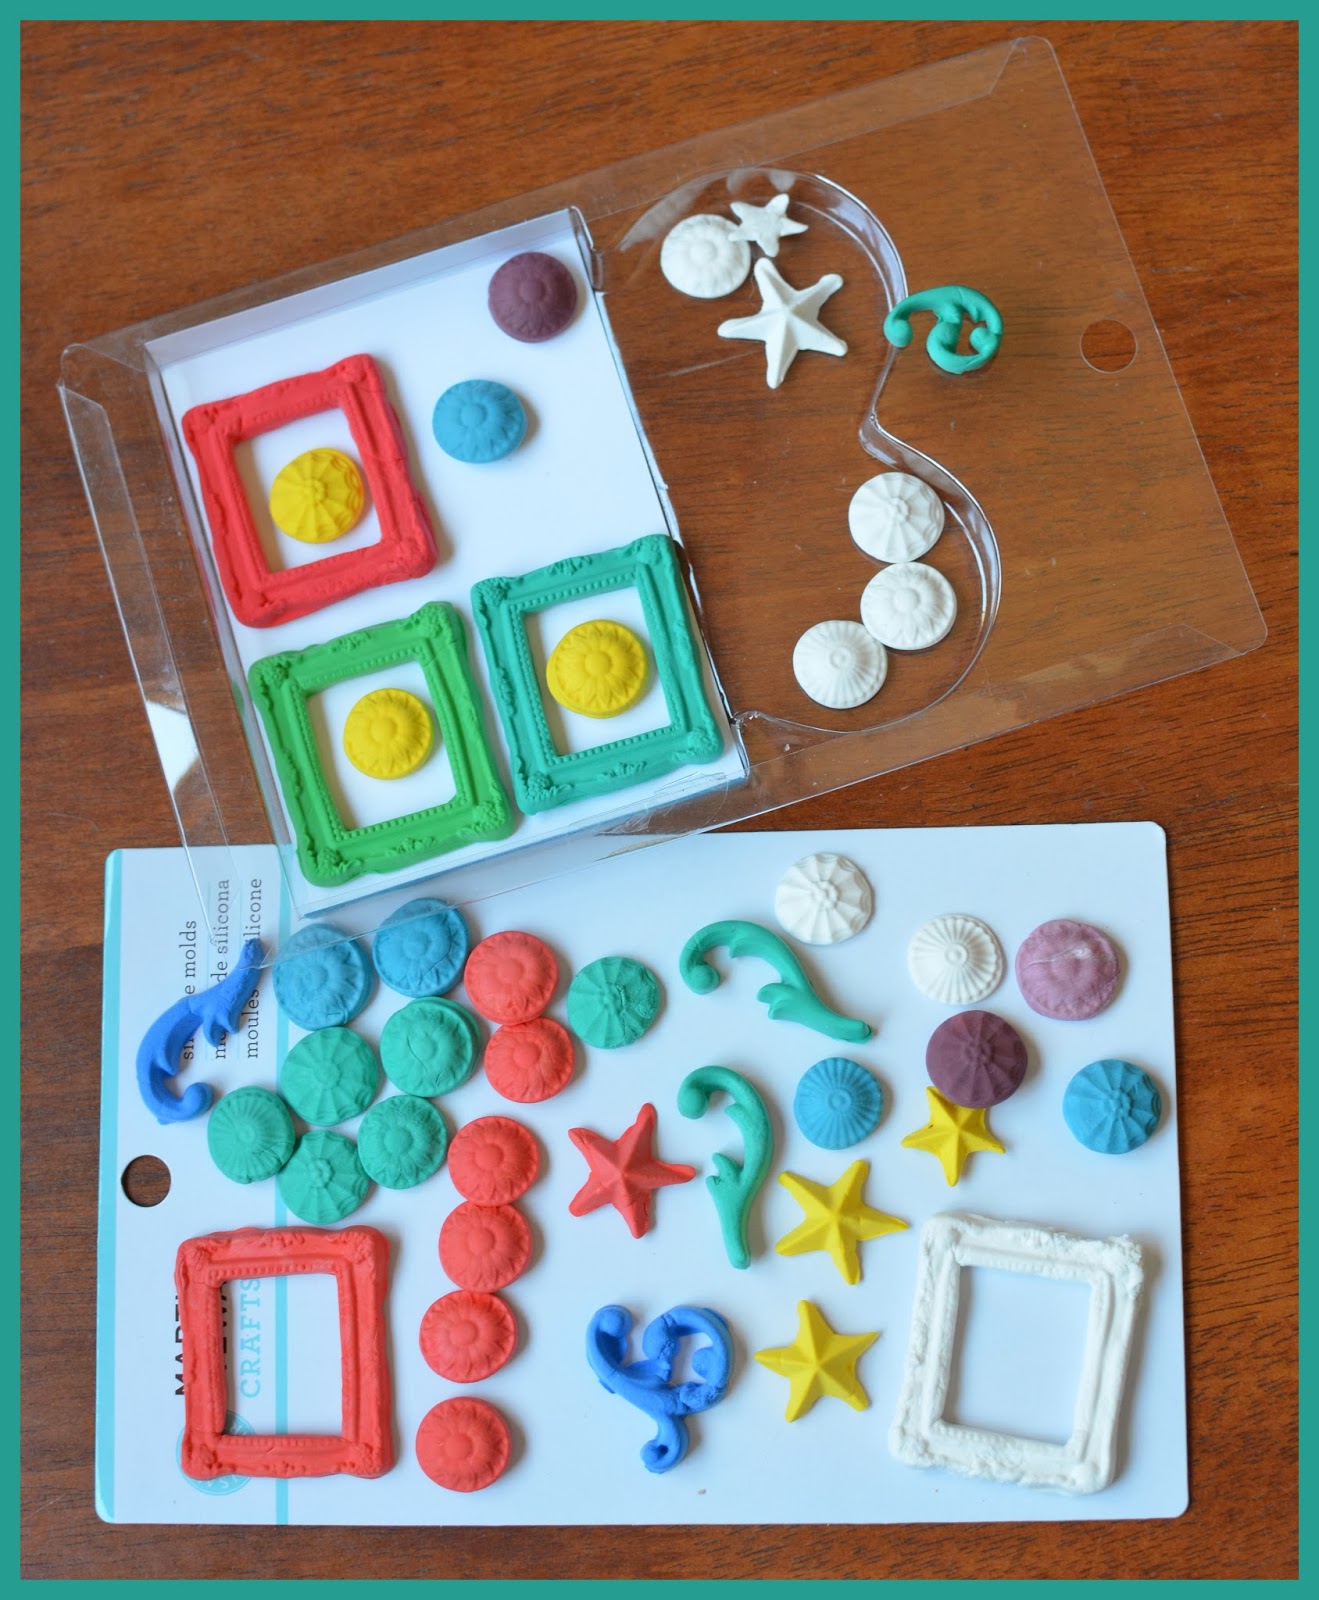
I found my air dry Magic (paper) clay the other day.  Truthfully, it wasn't exactly lost, just put aside for 3 or 4 years....I don't really know why, as  I went through a phase of stamping into it and making topper buttons for cards with quite pleasing results..."been there done that syndrome" perhaps? Anyway, when I saw these Martha Stewart molds, I thought it was time to get the clay out again.
Unfortunately the years of neglect meant that the clay was a bit dried out.  Surprisingly as long as there was some moisture left, it still seemed to work OK, but clearly needed using up ASAP......hence all these little card-sized bits and pieces - great results for little effort.  Just push the clay into the silicone mold, then carefully remove it and leave overnight to dry.

Saturday, 15 February 2014

WAXED PAPER DIE-CUT BACKGROUND

WAXED DIE-CUT BACKGROUND
Making the scrumpled waxed paper background the other week, made me think....

I've been using waxed lunchwrap with my doiley dies because it reduces the amount of paper left in the die, but this means that I'm left with a lot of waxed paper die-cut doileys.... I have actually used a few on some of my cards but mostly they end up in the bin.

This time I ironed the cut-out, waxed side down onto plain coloured card.  The result was a clear (clearer than this photo would suggest) albeit subtle impression.  The die-cut doiley still ended up in the bin, but at least I got a second use from it.

Remember to use a fairly cool iron on a dry setting.

Saturday, 8 February 2014

PAPER BEADS

PAPER BEADS

CLOSE UP
I made these a little while ago and have in fact worn them to work a couple of times (after all if you can't wear paper beads in a craft shop where can you wear them? )

One sheet of 12 x 12 paper will be enough to make all of these grey beads, as long as you end each in a point which becomes the edge of the wide end of the next bead.

I've just used a glue stick to add a bit of body as I wound them up and then coated the finished beads with Mod Podge to glue them properly and provide a protective finish.

After a bit of experimenting, the easiest way to do this seems to be to wind the elongated diamond shaped pieces of paper around a bamboo skewer  (you can make several on the one skewer).  After that if you rest the ends of the skewers across a shoe box or plastic container, you can brush the sealer over all the beads at once, and they will turn as you brush so all sides are done at once, and you can just leave them in place to dry.

For this necklace I've used white shell beads as a spacers.  I think the extra weight helps it hang better.

Saturday, 1 February 2014

WOODEN BOX WITH PAPER FEATURES

AUTUMN LEAF BOX
Marvin has been making some more boxes.  This one has a patterned paper (Autumn leaves) inset on the top, which was varnished afterwards.  A hole was made in the side of the box with a Forstener drill bit and the same paper was glued underneath a glass cabochon as a feature.
My contribution (and hence why I include it on my blog even if it is cheating a bit....well a lot) was to line the box with suede paper.
To my mind paper and wood are natural companions so I'll be exploring the combination more this year.

Saturday, 25 January 2014

WAXED PAPER BACKGROUND

CLOSE UP
CRUMPLED WAX PAPER BACKGROUND
 I've seen this in every second craft book but never tried it until now.
As with last week's post, this falls into my favourite category of super simple but really effective.  All you need to do is crumple up a piece of waxed paper then gently iron it with a coolish iron, waxed side down against the paper to which you want to transfer the pattern.  Apart from remembering not to have the iron on steam, that's really all there is to it.

Saturday, 18 January 2014

SUPER SIMPLE DO IT YOURSELF BACKGROUND STAMP

STRING STAMP
I think this photo is fairly self-explanatory but......  If you would like a simple background stamp, just wrap string around a block of some sort (I used the box which used to be packaging for a hole punch).  Tie it off at the top so that the knot doesn't intrude into the design,  Paint on a little acrylic paint and stamp it gently onto the surfact you want to decorate. Too much pressure tends to squeeze the paint out, so all you need is basically to make contact with the paper/card.
thats all there is to it.  Cheap as chips and quite effective!

Saturday, 11 January 2014

MORE PENDANTS

MORE PENDANT IDEAS
I'm still enjoying playing with wearable paper.  Two of these are photos (the red and gold round picture is the ceiling of a local church, the other is one of my touristy snaps from London.  The top example is a bit of a "ring in" as it is made from wood veneer.  For the record I'm not super keen on the end result with this one as the glue reacted strangely - I think that perhaps sealing it first would help.

The same is somewhat true for the photos - the London one in particular (printed on my home inkjet printer) went a bit blurry as the dimensional magic I used as glue dissolved some of the printer ink.  It was a bit of a happy mistake in this case as I don't mind the end result at all.  I used less glue on the other photo and there were no problems.

All of these so far have glass tops, but the remaining pendant features a cut out from a Kaiser paper pad, and is topped with an acrylic sticker.  This worked way better than I would have predicted.  I was going to use it as a card embellishment but am now thinking it might have an outing or two around my neck before I consign it to the craft box.

Saturday, 4 January 2014

USING STENCILS IN CUTTLEBUG

MACHINE EMBOSSED STENCILS
One of my on-going resolutions regarding my craft supplies is to "use or lose it."   Now of course I don't want to get rid of anything potentially useful - which is just about everything, so I've been raiding the shelves and re-discovering some almost forgotten "toys."

In the olden days (i.e. a few years ago) machines like the Cuttlebug and Bigshot were rarities and when we wanted to emboss a pattern we used either a lightbox or a window and a brass or plastic stencil combined with a stylus to hand-emboss our paper.

With the advent of embossing folders my collection of brass and plastic stencils has stayed unused and unloved for a very long time.  I've just bought a new rubber embossing mat for my Cuttlebug so I thought it was a good time to try it out with these stencils.  Previously I hadn't been overly impressed with the results but this mat is fabulous and suddenly I'm all enthused about using all my long-neglected stencils again, especially as I don't have to laboriously trace around them all by hand!!  The main thing I have learnt is that the type of embossing mat used DOES make a difference.

The stack I used was A, B, stencil, paper, rubber mat, B.  Do be aware though, that despite a lot of info around that suggest otherwise, there is no magic combination that suits all situations - it really depends on the thickness of your paper/card, the thickness of your rubber mats, whether your plates have a bit of a bend or not etc.  The trick is to do a few trial runs before the main project, and never force a stack that feels too thick through the machine.  The examples shown in the photo were my trial runs and hence they aren't properly centred etc.  I had anticipated having to muck around with bits of cardboard etc. and was pleasantly surprised to find it worked first pop with both kinds of stencil!
Saturday, 28 December 2013

Die Cuts and Dimensional Magic

Whoops......I only realized I'd forgotten to put any text with this picture when I checked that it had posted late last night.......and then decided I'd rather go to bed and fix it in the morning......and it is still technically morning.

Its a lovely time of year and I've just come in from the garden where we have an abundance of berries to pick this year.  We didn't have so very many last year and totally neglected the plants with a view to removing them this winter.....obviously this is the key to success as the strawberries, raspberries,  and currants (black, red and white) are all outdoing themselves this season, with lots of bramble berries to come (if we beat the birds to them).

Anyway (who can tell I'm in holiday mode?) this is not "Garden trek" but "Papertrek" and this weeks sample are a couple of little motifs made with a combination of Cuttlebug die cuts (from thick cardboard/chipboard), and Dimensional Magic.  I've used scrapbooking paper on the top one, and Kaiser pens (I assume any alcohol marker would work) to add colour to the bottom.  the end result is quite a solid little ornament that could be adapted for jewellry or to hang on the tree next year!

Saturday, 21 December 2013

PATTERNED PAPER AS INSPIRATION


There have been a lot of lovely patterned papers around lately.  Quite apart from various ways they can be used in their own right , sometimes they can provide the inspiration for other projects.  The thought process for these quick cards was provided by Kaiser's Sweet Pea range - even although they haven't really ended up as "obviously related".  As you can see, I'm loving the look of  stamped Versamark Dazzle on Botany/Kraft paper for backgrounds at the moment.

Saturday, 14 December 2013

DIE CUT FOAM STAMPS

Super-easy "background in a hurry" idea - three thin foam die cuts (using an old Cuttlebug die set) stuck to a clear block, inked up with Versamark dazzle and stamped at various angles onto Kraft card - about 5 minutes work, even including cutting out the stamps.  I really must experiment more with using die-cuts with ink and paint - if only the Time Fairy would wave her magic wand and create a few more hours in the day!!!!!!

Saturday, 7 December 2013

CARDS WITH WOVEN FEATURES

"FREESTYLE WEAVING"

"FORMAL WEAVING"
Here's a different style of paper weaving using slits cut into the middle panel of a 3-panel card as the base.  The fist example is fairly random, and the strips are torn , with the ends visible.  I've just added 3 die-cut shapes across the panel to finish.

The second example is more formal, with the ends hidden on the back and the border emphasized with different sizes of diecut daisies.

In both cases, after weaving, I added tape to the back to make sure everything stays in place.  The messy back is hidden when the third panel is secured over the top.  These examples have both been kept monochromatic - they are made from Botany (Kraft) card, (browner than they appear on screen)  but it would be fun to experiment with different colours.

Saturday, 30 November 2013

FOLDING EMBOSSED PAPER

ORIGAMI CARD AND BOOKMARKS
I love paper folding so this is not the point of this weeks post - its was, rather finding out whether this highly embossed and somewhat stretchy paper could be folded.  The answer is "yes" although I wouldn't try models that involved a lot of sharp creases as the embossing tends to tear, nor any models that need too many folds as the embossing adds thickness.  HOWEVER.......simple folds like this are fine.  Just make a waterbomb base (a square folded in half with the sides squashed in (http://www.origami-instructions.com has clear diagrams if you need them).  The next step is to lift one side on the front and squash it flat, turn over and repeat on the other side.  That's it!  Place four side by side to make the motif on the card.  Make and package a few more to give as a gift - they slip nicely over page corners to make bookmarks.

Saturday, 23 November 2013

PRINTING ON BOOK PAGES

PAGE TAPED TO A4 PAPER 
CLOSE VIEW


Its easy enough to combine images using software such as Elements, but it never looks quite the same as the "real thing".  I have a few old books that I use for various projects and wanted to experiment with printing out some clip art onto the pages.  The only problem was that being a very old (and cheap) paperback, the quality of the paper was poor and I didn't want it shedding "bits" in the printer, plus it was an odd size which isn't a major issue but still a bit annoying.  The solution was to use a couple of tiny pieces of thin double sided tape to secure the book page to an ordinary piece of white A4 copier paper,  The floral picture was placed in the middle of an A4 document, and then printed out onto the taped book page.  It all worked rather well except.........I knew which side of the paper the printer printed on but obviously now realize that I didn't know which way up it printed as it ended up being upside down - something you can't get away with when using text!!  Oh well, the point of this blog is to try different things each week and work out how to improve my efforts the next time around!!  (P.S. The pretty picture of the lily was free clipart but I didn't reference where it came from - sorry- I'd love to add the appropriate attribution if anyone recognizes the source).

Saturday, 16 November 2013

PAPER EARRINGS-

Here are some earrings made with cardboard and paper and I think quite wearable.

I cut six circles of the same size out of very thick card with my Cuttlebug. I then stuck some text scrapbooking paper to another piece of the the card with double-sided Jac paper, and cut two more circles.

The circles were then divided into two groups and stuck together with Jac paper to form a really thick base.

A thick coating of Dimensional Magic was put on top of the patterned paper, and when it was dry, and earring post was glued to the back.

I decorated the top of a paper mache box with a book page, and smudged some brown ink over the top.  The rosette is made with layers of punched  flower shapes secured in the middle with a split pin, and the packing is scrunched up book pages.