
Showing posts with label Punches and Die-cuts. Show all posts
Showing posts with label Punches and Die-cuts. Show all posts
Saturday, 15 September 2018

Friday, 12 January 2018
 |
| TEA THEMED CARD. |
The success was the mottled background paper. I had some large leafed loose vanilla tea, which I enjoyed as a cuppa, and then spread the leaves over a piece of plain white card, leaving it overnight to dry. The leaves died the card this great mottled brown but also gave it a lovely vanilla scent that lasted for a couple of months!
The issues arose with the teacup. I stamped it on thick cardboard with a dye ink, and then heat embossed it with three layers of ultra thick clear embossing powder. This is where it all went astray. Firstly, the Versamark and molten embossing powder caused the stamped writing to run just a little. This wasn't too bad in this context but could cause problems if a crisp image was important. Next time I will try heat set pigment ink and if this doesn't work, Staz-On.
The next problem was the embossing, even although the cardboard was quite thick, it wasn't thick enough for the layers of embossing powder and the heating involved and it curled quite badly. Again, as I wanted to crack the powder it didn't matter too much, and I could straighten it out however it wasn't ideal, and next time I'll die cut two or three thick cups and glue them together to make an ultra-thick base.
Lastly, I wanted to crack the embossing powder and ink over it with sepia ink . I tried to do this by bending the teacup shape backwards and forwards with the results that some pieces came parially off the page, whilst others absolutely refused to break! When I inked it, instead of sitting in subtle cracks the ink leaked under the broken edges and ended up making the whole thing look a bit more smudgy than cracked. So......next time I might try the freezer method, and a thicker ink (I used distress ink).
Next time might be a while though......I'll have to work up to it! On the bright side, I do love the little teacup and tea bag dies from Paper Roses, and I'll definitely put them to good use on other projects.
Saturday, 26 August 2017
FOILING WITH DIES
 |
| FOILING WITH THIN CUTTING DIES |
One of the appealing bits about the machine is that you can use thin metal dies as well as the specially made foiling dies. The only thing to remember is that if you use them face up, the bit that will be foiled will be the raised cutting edges rather than the "solid" shape of the die, so its important to chose one that is appropriate and doesn't get "lost" through lack of detail. This spider's web worked quite well - probably better than it did as a traditional die!
Tuesday, 4 July 2017
GLITTER "STAINED GLASS" TECHNIQUE
 |
| COLOURED GLITTER PICTURE IN PROGRESS |
Just chose a die with a lot of open spaced suitable for colouring. I cut this Art Deco parrot with double sided adhesive on black card so all I had to do was peel off the backing
to stick it onto Kaiser crystal glitter card.
The next step is to use some Tombow pens to colour the image. (You can experiment with different types of pens but I was happy with these).
The glitter stays glittery and the end result is a cheery "stained glass" effect,
 |
| GLITTER "STAINED GLASS" |
Sunday, 6 November 2016
SANDING SHIMMER CARD FOR A "RUSTY" LOOK

The one I was "showing" was that shimmer card (the copper of the ute) has a colour core so when you sand it, a matte colour shows through, in this case making the Ultimate Craft's"Rusty Old Ute" die look quite rusty!
The background was a combo of gold and copper paint randomly applied to turquoise card, then stamped with a corrugated iron background stamp (from Darkroom Door), but without using a block and just applying uneven pressure with my fingers so that not all the image stamped. Heat embossing with silver pwder and a drawn silver line complete the background.
Sunday, 2 October 2016
USE YOUR DIES TO EMBOSS
 |
| SHIP EMBOSSED WITH KAISER DIE |
Don't forget that you can use your dies (this one if from Kaiser) to emboss by using a rubber mat with your B plates (or C plate and cardboard if its thick),
I've used a core colour card and sanded it after embossing to make the embossing more pronounced in this example.
The anchors on the red card behind were done more conventionally with an embossing folder. After embossing the raised pattern was "swiped" with white ink to give a similar effect to the blue embossing even although each was achieved in quite a different way.
Saturday, 4 June 2016
DIE CUT FABRIC FRAME

In this example I'd stuck some thin cotton fabric to double sided Jac paper which is a good way to not only prevent fraying but apply an even layer of adhesive to the surface.
The actual shape I wanted was the butterfly, but it seemed a shame to throw away the left over fabric so I stuck it onto a scrap of embossed card and die-cut both layers with a circle die.
Fabric frames have potential. You could add real or faux stitching or frame a photo of someone wearing a garment made of the actual fabric for a scrapbook page etc. I'm not sure its something I'll do a lot but its worth adding to the list!
Saturday, 5 March 2016
DIE CUT FROM PHOTOS
 |
| Photo and dies |
 |
| Die-cut birds from repurposed photos |
I like playing around with photos....sometimes it works out, sometimes it doesn't end up quite as I imagined it would, or I get carried away and have extra prints, when one is sufficient. The red daisy photo was an example of the latter, but as I hate throwing things away, I decided cut out a flock of little birds instead.
I'm quite pleased with the end result - the photo (commercially printed) has a nice surface sheen, the paper is stiff enough to be mounted with foam dots and keep its shape, and it cut easily. If you were really keen you could even design your own prints especially for certain dies (I'm already imagining a collage of tiny feathers for these guys). You can get a 15 x 10cm print for just a few cents from many processors nowadays - bargain thick patterned paper!!
Saturday, 18 July 2015
USE A CUTTING DIE IN LOTS OF DIFFERENT WAYS
There are a lot of sites around that feature different ways to cut up and use punched shapes but not so much about dies, which are just as versatile, if not more so. I played with my lectern and bird set from Couture Creations and came up with a few ideas, and that was without even combining shapes....I must have a look at some of my other dies and see how else they can be used!
 |
| LOTS OF WAYS TO USE ONE CUTTING DIE |
Saturday, 4 July 2015
EASY FRIDGE MAGNETS
 |
| FRIDGE MAGNETS |
The first isn't strictly papercraft but it does involve a couple of things you might have in your craft room - the thin magnet sheet that comes with most dies, a die (in this case a Spellbinders dress stand), and a die-cutting machine in which to use it. (I used my trusty Cuttlebug).
I expected to be able to cut the shape with the die, but was pleasantly surprised to find that with the rubber embossing mat, the detail could be embossed onto the magnet! I made this over a year ago, and have been kind of waiting for the detail to disappear - it hasn't!
The second magnet is just some pretty Washi stuck onto a glass cabouchon, with a fairly heavy duty magnet (due to the weight of the glass) stuck onto the back.
I'm happy enough with both of them to allow them a spot on the side of the fridge!
Saturday, 18 April 2015
TUNNEL BOOK
 |
| Tunnel Book |
Begin with two accordian pleated sides of the same size. Add panels of the same size with centred cut outs of decreasing size. (I used nesting dies).
I put a piece of mirror board at the end, so you can look down the tunnel and see yourself! If you're more arty, you could make a scene with different features on each layer.
Saturday, 7 March 2015
DIE CUTS FROM WASHI TAPES

 |
| WASHI TAPE DIE-CUTS |
Saturday, 7 February 2015
MARKERS WITH SPRITZER
 |
| SPRITZED SHAPES |
The samples were made just to explore a couple of techniques and to see if I wanted to buy the more upmarket version of the tool. The first is just to spritz through a punched hole, which as you can see worked quite well. The second is a daisy punched from a piece of paper with colours sprayed over some outline stickers which were then peeled off. This worked OK too, so...maybe my bright orange spritzer will do for now........
Saturday, 18 October 2014
DIE CUT WITH FABRIC
 |
| DIE CUT WITH FABRIc |
If you cut with the fabric face down on the die, the edges bend over slightly and you can get away without having to ink the sides.
You might have to experiment to find out which of your dies are up to the task as the ones designed for thin paper won't have enough cutting power. I haven't tried a doiley die, but suspect the more intricate cutters wouldn't work very well either. This is a thick Sizzix die, but I expect most of the nesting dies and the old silver Cuttlebug ones would work too.
As long as the stack you use is not too thick for your machine, it won't hurt to experiment!
Saturday, 6 September 2014
PARTIAL DIE CUTTING
 |
| PARTIAL DIE-CUT |
 |
| TAGS FEATURING PARTIAL DIE-CUTTING |
I'm now starting to look at my dies in a whole new way, when I consider all the different sections that could be used in different ways.
Saturday, 23 August 2014
CUT A RECTANGLE WITH A SQUARE DIE
 |
| RECTANGLE FROM A SQUARE DIE |
Position your die and paper in your Cuttlebug, roll through almost, but not quite to the end, then roll backwards. Reposition the die so that the scallops align, at the end. (You might want to use some removable tape to make sure it stays in place). Roll through to complete your cut.
That's all there is to it!! I'm not sure how it would work in other die-cutting machines but expect the same principle would probably apply.
Saturday, 16 August 2014
SLIGHTLY MORE THAN SIMPLE FANS
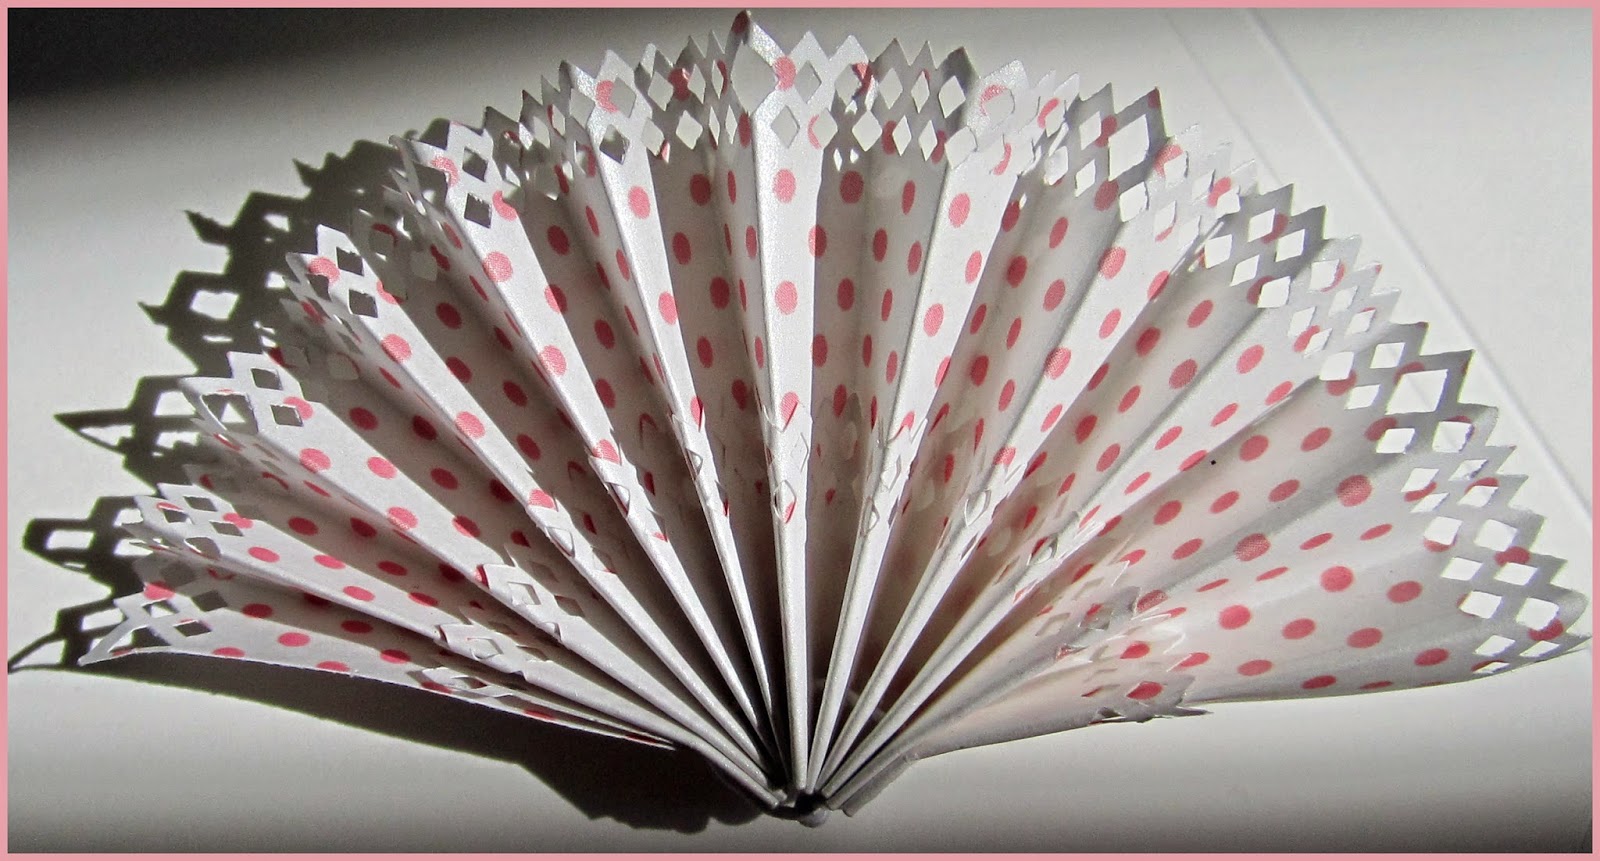 |
| THE FINISHED FAN |
Here are three folded fan ideas.
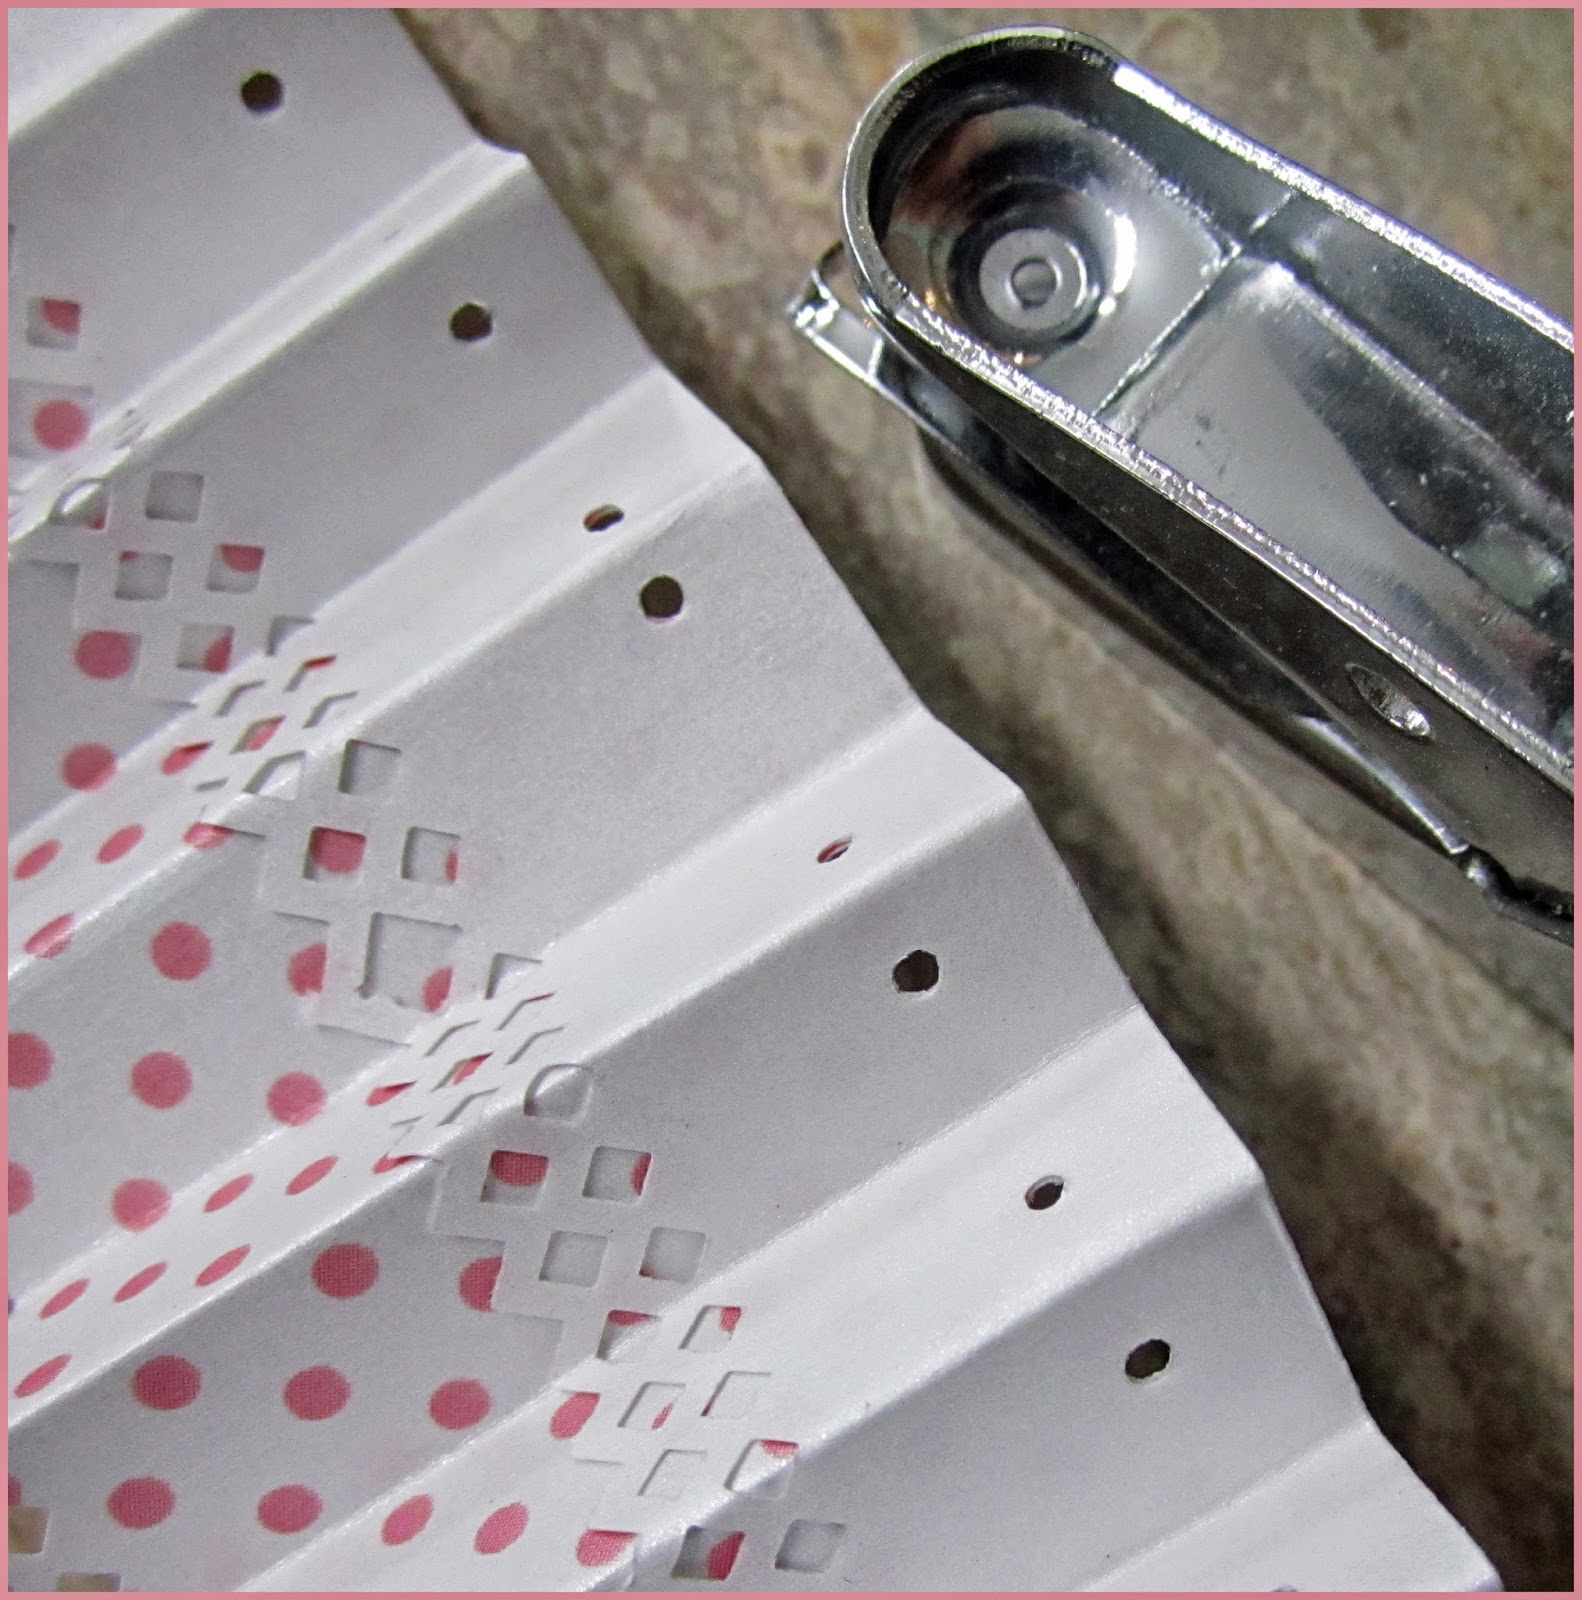 |
| FOLDED AND PUNCHED LOWER EDGE |
2. Bend the bottom up so that the reverse colour (in this case white) makes a contrasting section at the base of the fan. (After posting this I realize I probably should have used a less subtle contrast in my example - but give it a try if you want to see for yourself how much it adds to the "basic" fan.)
3. Staples are a bit ugly (unless you're going for a grunge or industrial look) and are a bit hard to get through lots of layers, and glue can be messy and hard to apply in all those pleats, so an alternative way of securing the bottom is to punch along the (in this case, folded) bottom edge with a small circle handpunch, then thread thin white-coated wire in and out of the holes. Fold up the paper, pull the wire tight and twist the edges together to secure.
Happy fan making!!!!
Saturday, 9 August 2014
ENGRAVING WITH A DIE
 |
| ENGRAVING WITH A DIE |
I think experimenting with using extra-thick card (or a couple of pieces of card) with the intention of NOT cutting the shape out of one is worthwhile. (Do adjust the stack accordingly, though, and never force anything through, as tough as they are Cuttlebugs and Bigshots are breakable if you overdo it.
A bit of inking over the top would add interest. I think with a little effort I could probably get a nice engraved leather look.........but that will have to wait. So much I want to do, so little time!!!!!!!!!!
Saturday, 17 May 2014
POWDER STAMPING - ONE THAT DIDN'T WORK!
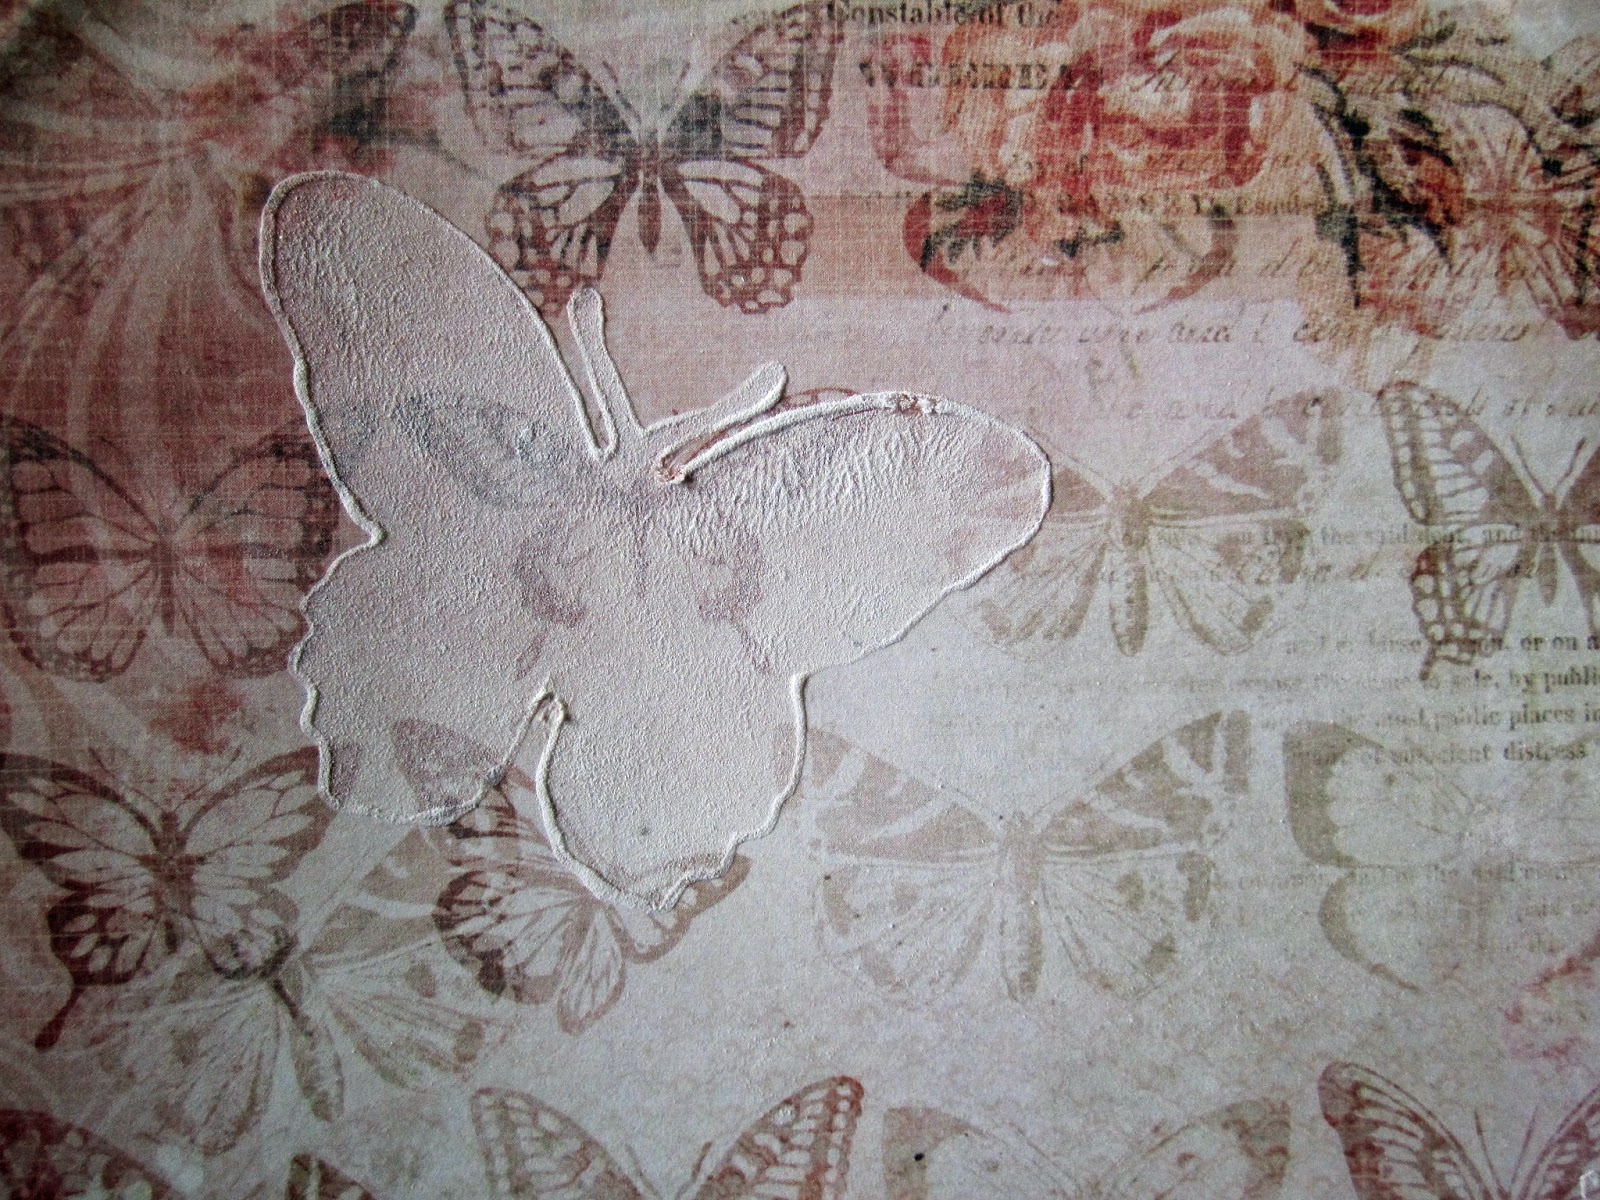 |
| POWDER BUTTERFLY |
This could be possibly my fault as the original idea was to stamp with a foam stamp using wood glue and then sprinkle with talcum powder for a soft, suede-like result. Not wanting to potentially ruin any of my stamps I die-cut a butterfly from fun foam and used that as a stamp, and because I used Mod Podge rather than wood glue as I figured both were more or less variants of PVA.
On the first attempt, I brushed the glue on, but the result was very ridgy and the glue oozed over the sides of the stamp. On the second try, I applied the glue lightly with my finger, as you can see the glue still migrated to the side when pressure was put on the stamp. Not only that but most of the powder rubbed straight off when the glue was dry.
Despite the fact its very messy, I might have another try as I did like the general result. Perhaps this time I might mix the talc with the glue and apply it through a stencil - I think it would stay put then. If not, a sealer might help.
In short, I can't recommend you repeat this technique but at least I might have saved you some time if you wanted to try it.
Saturday, 15 February 2014
WAXED PAPER DIE-CUT BACKGROUND
 |
| WAXED DIE-CUT BACKGROUND |
I've been using waxed lunchwrap with my doiley dies because it reduces the amount of paper left in the die, but this means that I'm left with a lot of waxed paper die-cut doileys.... I have actually used a few on some of my cards but mostly they end up in the bin.
This time I ironed the cut-out, waxed side down onto plain coloured card. The result was a clear (clearer than this photo would suggest) albeit subtle impression. The die-cut doiley still ended up in the bin, but at least I got a second use from it.
Remember to use a fairly cool iron on a dry setting.
Subscribe to:
Posts (Atom)